This is one of the most articles that you will find photoshop tutorials and tricks you probably didn't know, mostly has not been mentioned much on the internet, for us photographers and photo retouchers photo retouching is time consuming, it's an important thing to find tips and tricks or a hack from time to time making life easier.
Additionally, Updating your information in the Photo Editing career more often gets you higher in professionalism and mastering Photoshop, with more practicing if you are a beginner or a professional retoucher.
Whether you are using an old Photoshop version or the new 2020 Adobe Photoshop CC ( 21 ) which is the latest until the time of writing this article, most of the Photoshop tricks mentioned in the article will work with you and too far will benefit you enhancing your photo retouching skills and saving time.
Here at Photorelive. this is how we get our photo retouching service done, using these tricks to save time while serving many orders.
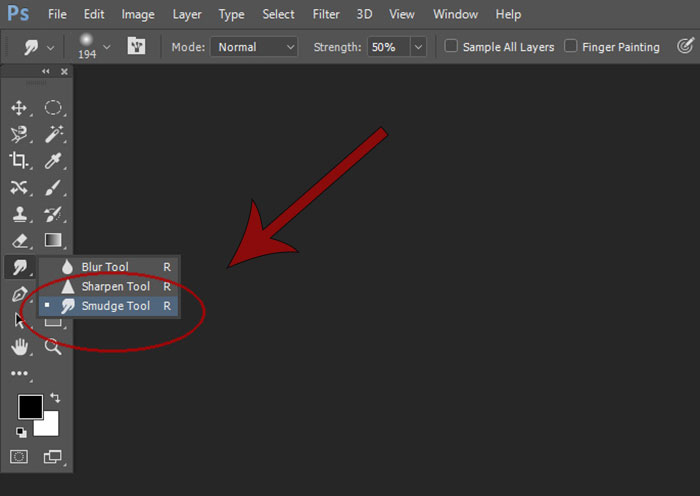
1. Smudge Tool for skin smoothing
Skin smoothing is one of the most time-consuming parts when editing a photo.
The most popular tool doing it is the Cloning Stamp and then comes the healing tool, with the flexibility of Photoshop a lot of tools can be used for skin smoothing including the ( Smudge tool ) with a little change in the smudge brush settings you can use it for skin airbrushing :
- Open Photoshop, select the Smudge using the keyboard shortcut ( R )
- Open the Brush panel from : window > > Brush
- Uncheck all the marks on the left side, except for Scattering and Noise
- Click on ( Brush tip shape ) un-sign the spacing button
- Make the angle minus 17 ( -17 ) and close the window.

Now set the strength of the smudge to 5: 8 depending on your need for the smoothing level you can set it directly using the keyboard shortcut ( 05 ) zero then 5 right away.
And there you go, now you can pass it on the skin ( rubbing the tool on the skin ) to make it smoother, use it carefully and evenly all over the skin, for the skin not to look like patches of smoothed parts.
Here you can see the results after editing the photo using the Photoshop smudge tool, the skin has become clear and smoothed :

However, you have to take care of your steps while skin smoothing, as the smudge tool may erase the texture of the skin and will give you nonprofessional results, do it slow and careful and set a low smudge strength.
it would work the best for average photography studio photos while for models and high-end photo retouching it's preferred to use the healing tool or the cloning stamp to keep the texture looking natural still.
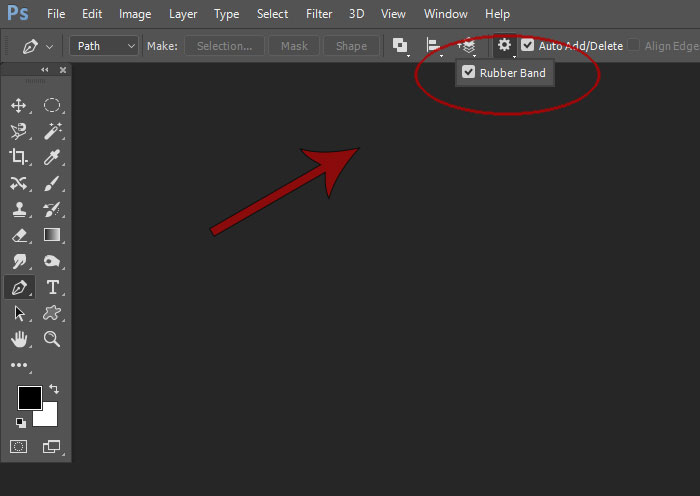
2. Rubber Band option for pen tool
Photoshop pen-tool is one of the most tools which has made a big change in photography and photo editing, who doesn't use pen-tool clipping path and changing background in photos!?
Of course, there are a lot of plugins and ways to change the background, still using the pen in Photoshop always gives better results, while it's a must when it comes to clipping path, saving the path of an object to extract it's layer later for background changing and removal purposes.
A little change can make background changing easier by enabling the Rubber band option which will show you the full path of your pen tool while marking on an object, simply follow the steps here :
- Select the Pen tool using the keyboard shortcut ( P )
- Head to the panel in the top, click on the settings icon
- Enable ( Rubber Band )
Now the expected path will follow the pen tool icon wherever your mouse moves.

Clipping path now can be easier and faster especially when working on bulk amounts of images products, objects and so on to extract the background it will help much to speed the process while keeping the path more accurate
Avoiding the need to fix parts of the background which has been clipped with the object that you need to extract.
You can also use the rubber band in a variety of other usages such as drawing, you can draw a path and set a stroke for the path using brush or pencil and so on to replace the pen tool path with a drawn line, the rubber band will give you the curvy look to your drawings.
the same goes for Fill path to fill the path you have made with color inside the curved shape you made, just right click after drawing a path and you will find these options in the menu that appeared.
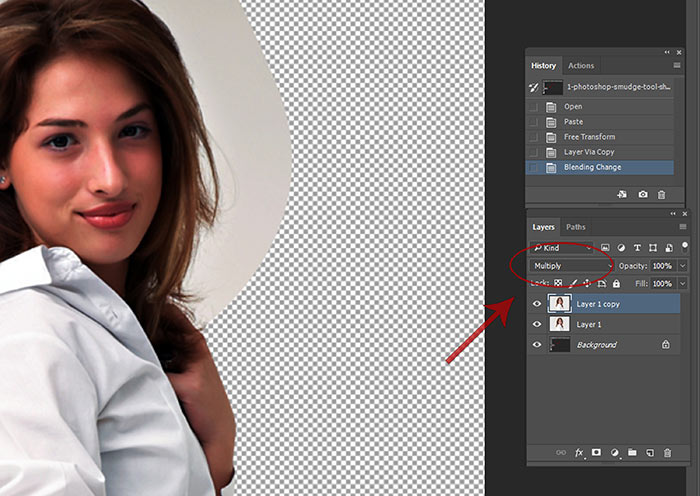
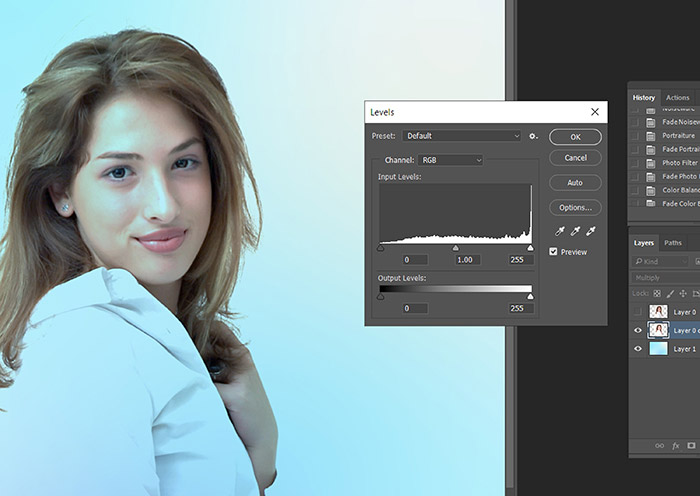
3. Extract hair naturally using Multiply
This is one of the coolest Photoshop tricks extracting the hair of a person from a background which takes much less time than the rest of the other methods when editing a photo, with a small trick changing the layer from Normal to Multiply
this Photoshop effect will make the original background surrounding area of the hair almost transparent on the new background applied, you can try it yourself following this Photoshop tutorial here :
- Extract the person from the background and leave the background area around the hair
- Copy the extracted layer and set it to Multiply, move the Multiply layer below the Normal layer
- Now put your background below all layers
- Increase the brightness/levels of the image until the background surrounding the hair disappear
- Use the eraser tool to erase around the hair carefully on the edges
- There you go with a natural hair extracted

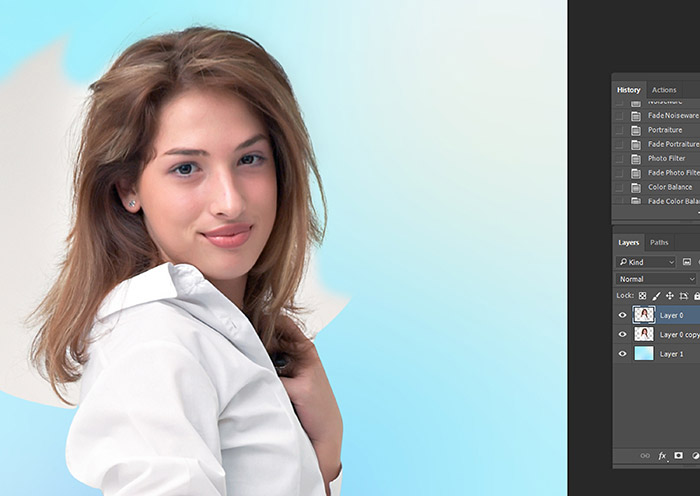

This is the most preferred method as it keeps the hair completely natural especially on messy hair / flyaway hair and works the best on bright backgrounds, for many dark backgrounds the best way would be using the extract tool or the pen tool for more natural results.
4. Clean un-cleaned Background with Smudge
It's impressive how you can use the same tool in multiple ways, still with different results. and can make the process faster when fixing and restoring old photos backgrounds.
Photoshop flexibility has done that in a great way, Smudge tool can also get used with enabling the settings mentioned in the first paragraph, you can use it to clean the background from dirt and scratches or smoothing wrinkles, which happens by time almost in any photography studio.
you can see the difference between the before and after here :
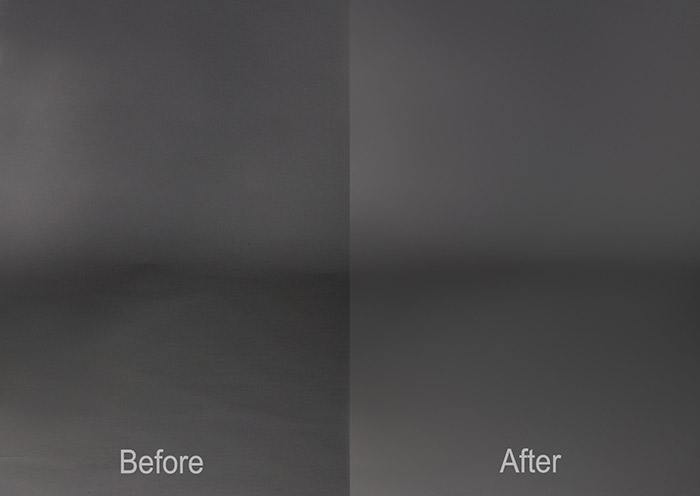
If you are a photographer my advice to you would be to clean the indoor backgrounds daily especially the lower part where each client step on, as it will save much time getting wasted through photo editing to smooth the background removing the scratches and dirt and so on
Additionally .. and let the retoucher concentrate more on the beautifying sides of an image instead of cleaning and cleaning the same background in each photo over and over a g a i n : )
5. Using Fade instead of Undo
The Fade tool is used for fading and decreasing a step you have done in Photoshop, a lot of times a retoucher may just un-do a step from the history.
while the most professional retouchers use the fade tool instead. Which is one of the most important Photoshop tricks and photo editing tips to give better results saving time
whenever you make a step which you don't want to undo but only to decrease, use the shortcuts :
( Ctrl + Shift + F ) for Windows or ( Command + Shift + F ) for Mac
a panel will open showing you the percentage you need to fade or decrease from a step you have just done.
you can use it decreasing a filter effect you have just applied or painting using brush, or any other tool, which works with most of the tools. set it to 50% more or less and you will see the change.
As of my knowledge not many retouchers know this trick, though it's the most useful when editing bulk amounts of photos, without having to undo and repeat the same step.
Hint: use the num-keys to set the percentage faster.
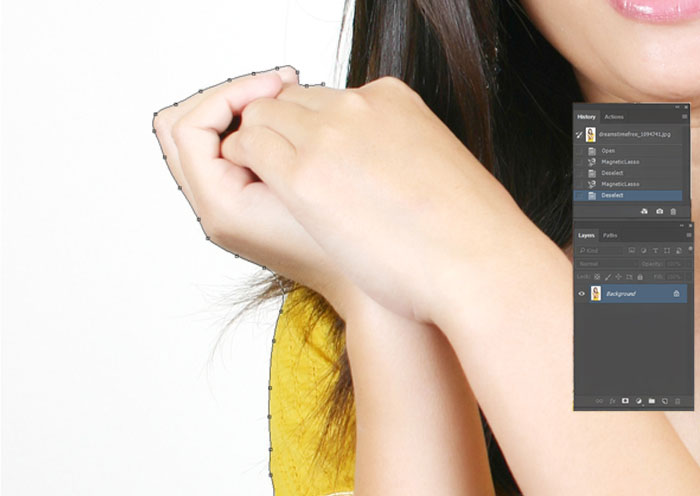
6. Change background using Magnetic Lasso Tool
Not the most professional way to change a background in Photoshop
but one of the easiest for non-complicated backgrounds, usually works the best on solid backgrounds.
The tool helps you trace and outline the exact part you need to work on or extract…
From the Tools panel in Photoshop on the left side you can pick the magnetic tool or simply from the keyboard press ( L ) and you can ( shift + L ) to switch between the different lasso tools.
- now open your image and move the tool close to the edge of the object you need to extract from the background.
- Click using the Magnetic tool and keep moving the mouse all the way like the picture below
- you can undo the dots of magnetic tool using ( backspace )
- When done press Enter to make the selection
The magnetic lasso is more considered to be a tool that we use when we are bored and need to play talking here about professional retouchers, as it won't give the best results except when working on a solid and easy to extract types of backgrounds.
probably Adobe has made that tool for beginners trying to do it the easiest way :)
7. Arrange all pictures vertically
One of the cool tricks for Photoshop when you need to see all photos arranged beside each other, from the Photoshop panel on top click on:
Window >> Arrange >> Arrange all vertically
This is mostly used when you need to use parts of other photos into your main one, all over your screen at the same time, you can also arrange all the photos horizontally from the same panel ( Arrange ).
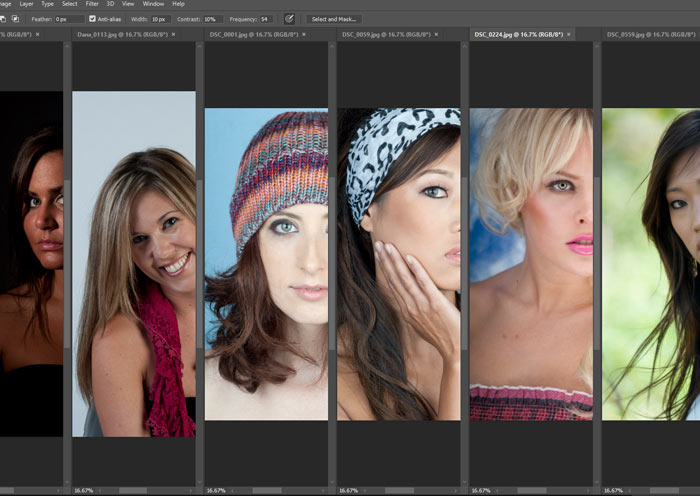
Arranging images is good when it comes to culling photos, selecting the best photos from a photography session and choosing the ones that need to be worked on.
Some of the photoshop Services websites provide a photo culling service, saving a photographer the time to pick and filter which images need to be selected for photo editing or printing
I still believe a photographer should select the pictures himself, cause no one would know his work better than him .. unless being extremely busy .. or lazy :)
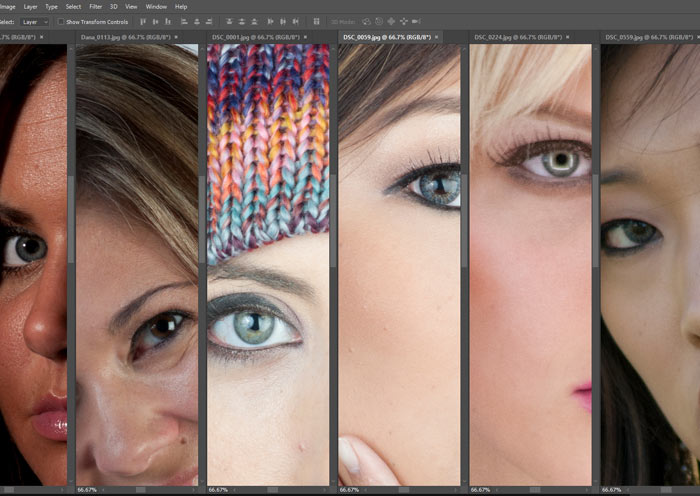
8. Zoom in and out all photos at the same time
This Photoshop trick is needed more often when editing multiple photos to may be compare them or any other usage you would need. try it yourself using the shortcut:
To zoom in :
( Ctrl + Shift + Space + Left click ) for Windows ( Command + Shift + Space + Left click ) for Mac.
Click on any image using the mouse left click and it will zoom in on all the photos shown in photoshop.
To zoom out :
( Ctrl + Shift + Alt + Space + Left click ) for Windows ( Command + Shift + Alt + Space + Left click ) for Mac.
And do the same clicking on the mouse left click.
Further than this, you can actually move all the pictures in the same time to the right or left
Using this shortcut (Shift + Space + Left click ) for Windows and Mac.
9. Shortcuts to repeat the last adjustment
One of the Photoshop tricks for ease of use and time saving which can be done using shortcuts only as most of the Photoshop secrets lay behind shortcuts.
Let's say you have applied brightness +5 and +7 contrast to a photo, which will be done using the shortcuts :
( Alt + I + A + C ) and setting the brightness to +5 and contrast to +7 manually.
now you need to apply the same adjustments to another photo, all you need to do it to keep on pressing ( Alt ) while pressing ( I then A then C ).
The first time we pressed ( Alt ) only one time, while the second time we held the ( Alt ) button to give the same previous adjustments to a different photo.
The same process can be applied to any other tool in Photoshop. You can check some examples here to repeat the last adjustment step :
Levels normal shortcut : ( Ctrl + L ) for windows ( Cmd + L ) for mac
Levels adjustments repeat :
( Ctrl + Alt + L ) all in the same time for windows, (Cmd + Alt + L ) All in the same time for mac
Curves normal shortcut : ( Ctrl + M ) for windows (Cmd + M ) for mac
Curves adjustments repeat :
( Ctrl + Alt + M ) all in the same time for windows,(Cmd + Alt + M ) All in the same time for mac
Hue normal shortcut : ( Ctrl + U ) for windows (Cmd + U ) for mac
Hue adjustments repeat :
( Ctrl + Alt + U ) all in the same time for windows, (Cmd + Alt + U ) All in the same time for mac
Selective color normal shortcut : ( Alt + I + A + S )
Selective color adjustments repeat : ( Alt + I + A + S ) while holding on the ( Alt ) button
If you need to apply the same filter with the same settings you set to a different photo all you need to do is using the shortcut here :
( Ctrl + Alt + F ) for windows ( Command + Alt + F ) for mac
10. Making a straight line using the brush
One of the most simple tricks for Photoshop, which gets used more often editing photos, is to make a straight line using brush tool, Healing tool, or smudge.
Hit the ( Shift ) button while using the brush tool, and you will get straight lines vertically or horizontally as shown here.
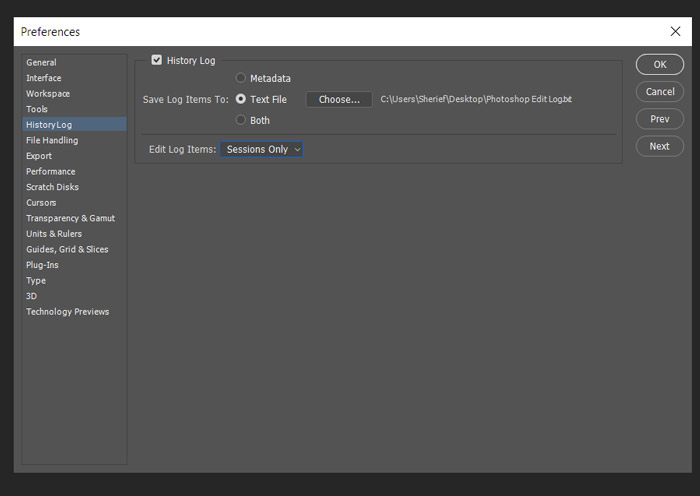
11. A text log record for every step
If you are a professional retoucher who is deeply into creativity and photo manipulations this Photoshop trick may actually concern you
if you ever made something that is so creative applying multiple and mixed filters which gave great results, an effect that made your image look fabulous
a lot of times we just work and work trying to make something so creative but we actually forget how we did it.
This method records all the steps you have made, simply enable it and you can get back any time to the exact full steps and mix of commands you made using photoshop
To keep a record of each step, open the preferences from Photoshop from :
Edit >> Preferences >> General >> History log
Or the shortcut ( Ctrl + K ) for windows ( Command + K ) for mac and enable History log
it has multiple options whether you need to save it as a text file or metadata and select the path where you want the file to be saved
Now you can keep track of every single command and step you have made.
12. Color picking trick
Usually, you can use the ( Alt ) button from the keyboard while the brush tool is selected ( B ) to pick a color within photoshop, an image or a screen
while actually, this little Photoshop trick will let you use a color from outside of window of Photoshop.
if you need to use a color from an object or a website " the very same color " all you need to do is keep on pressing the alt color and pick a color from Photoshop itself, then grab the tool to outside of Photoshop screen
If you tried to bring from outside of the Photoshop window first it simply won't work.
Conclusion:
Here are more tips for Photoshop that can be interesting for you, Photoshop tricks never end and the more you get deeper the more you discover a bigger world of tricks in Photoshop you didn't know, searching more often on Photoshop editing tips will give you an advantage and add you more experience
while practicing is the true key of becoming professional if you are a beginner, and a Photoshop guru if you have been in the career for long, the learning process never stop and the technology is changing daily.