Thank you for visiting this page, you have probably googled a lot to reach us here and you are looking for the masterpiece which will fulfill your curiosity finding tips for Photoshop
while time runs fast these days Photoshop tips for photographers become a need to save us time while working on a daily basis using the same tools for us "Photographers & Retouchers" retouching photos is time-consuming as we all know.
If you are using an old Photoshop version or the new 2020 Adobe Photoshop CC ( 21 ) which is the latest until the time of writing this article
most of the tricks and Photoshop tips mentioned here will work fine and will benefit you enhancing your photo editing skills in addition to saving much time.
1. Auto color tool can enhance your editing vision
This tool here which is referring to "Automatic color enhancing" a Photoshop smart tool which we "retouchers" can't live without.
It can simply enhance and fix the colors of your photo, or at least can give you a hint for what color adjustment does your photo need, it doesn't work perfectly all the time but as mentioned it helps to give a hint on what colors are missing from your photo.
For beginners :
Learning Photoshop is hard, and the hardest part is to see a photo like how a retoucher can view and see it, you may look at a photo that looks just fine, while a professional retoucher will think it's so bluish or reddish and needs color adjustments to be fixed.
To be skilled in colors :
practice more and more, challenge yourself look at the pictures around everywhere posters in the street and media wherever you go, and try to tell what is the missing color, what can be done to enhance the colors of this photo.
Use the Auto color tool :
the shortcut for Auto-color is ( Ctrl + Shift + B ) for windows ( Cmd + Shift + B ) for mac it adjusts the color of a photo increasing and decreasing levels, the curves, RGB which is referring to Red-Green-Blue.
If it's not going to fix, at least it can tell what needs to be corrected in the colors of your photo.

The Image here looks just fine! Actually it is not, it lacks contrast and color saturation, try the Auto-color and you will get my point.

Now here is the photo after adjusting what the Auto-color advised. Works perfectly.
For Professionals: use Auto-color twice
A great Photoshop editing tip here, If the first time Auto-coloring a photo doesn't work, do it again and you will see the difference, applying double Auto color correction on each other can give much better results in most of the cases in Photoshop.
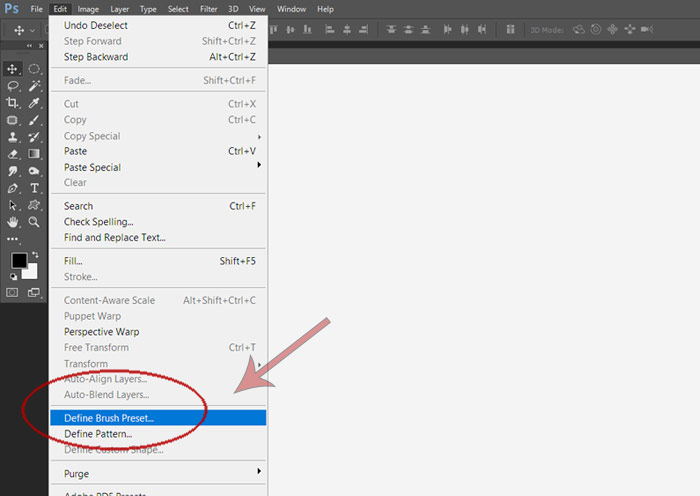
2. Create a brush from a photo
There are a lot of methods to do this in Photoshop, shortly the main step to create your custom brush is by making a layer and defining it as a brush from :
- Edit >> Define Brush Preset
- Set the name of your custom brush
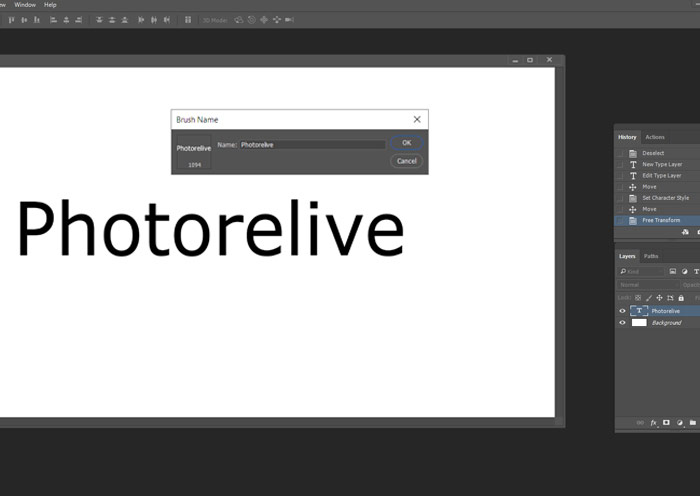
More detailed :
- 1. Open a new paper
- 2. Create a new empty layer
- 3. Draw whatever shape you would like, in the example here we made it a text
- 4. Select "Define Brush Preset" from the Edit menu and set a name
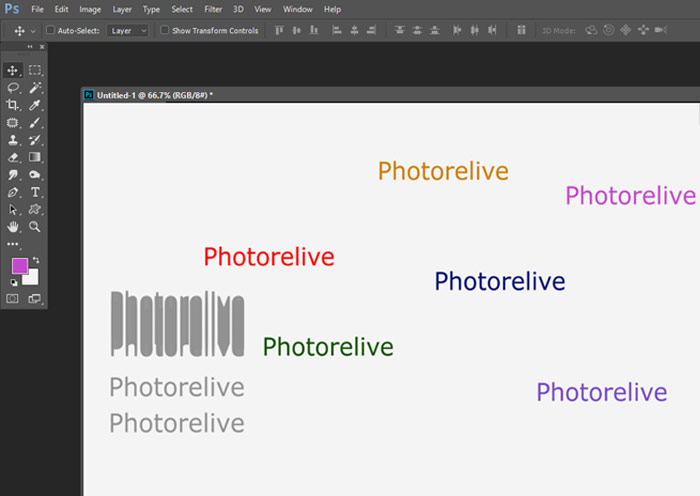
Now you can use your new custom brush as shown here :
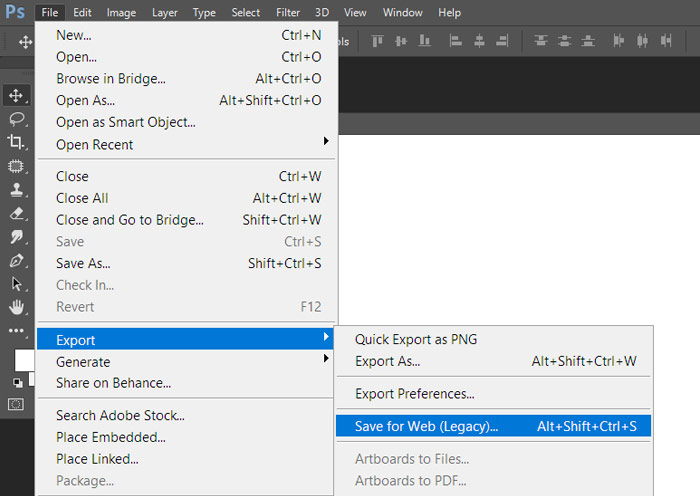
3. Compressing Photos on Photoshop for web "works great"!
With the new versions of Photoshop coming out Adobe is developing this magic tool, while long ago it wasn't the best to compress an image on Photoshop and keeping the same quality, the new versions can compress your web images amazingly.
Decreasing much of the image size which varies from an image to another, some photos can be compressed up to 20 % with the very same quality, while others can be compressed up to 80 %.
Fromthis path you can open the image saving tool specified for web :
File >> Export >> Save for web ( Legacy )
Shortcuts : ( Alt + Shift + Ctrl + S ) for windows ( Alt + Shift + Cmd + S ) for Mac
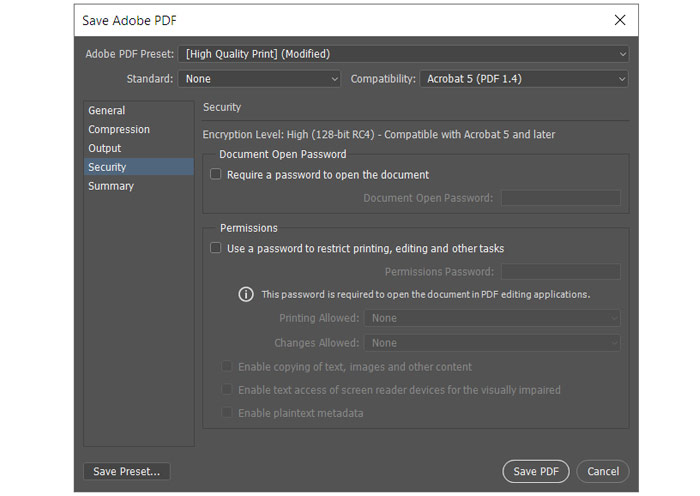
4. Protect your PDF image files with a password
One of the coolest Photoshop editing tips for photographers when sending demo photos or designed albums to a client. You can protect a file when sharing it with others, Adobe Photoshop provides Three levels of protection which is setting a required password to: Open, Edit, or even to print the file.
This way you can protect your files when sending a demo version of the design/photo to a client before being purchased. With even more options to control your copyrighted image.
And here is how you can do it :
From : File >> Save as >> select Photoshop PDF
A panel will open up where you can set all the needed options, choose Security, and strict your file from being opened or printed. Enter the password for security as shown here :
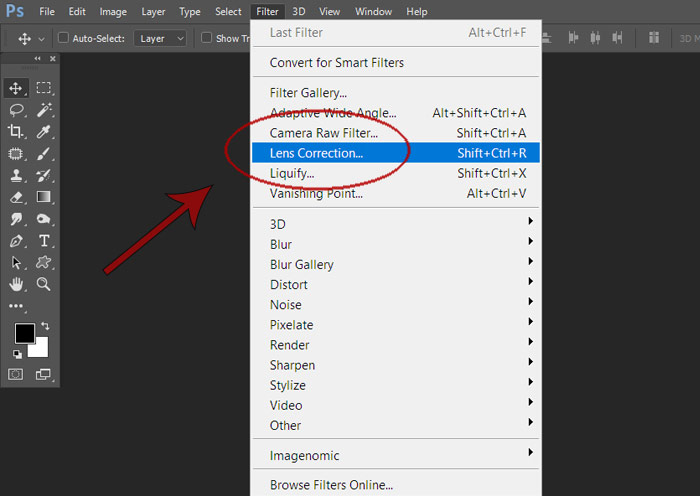
5. Lens correction can tell how professional you are
One of the most tools that are being ignored by photo retouchers when editing a photo is Lens Correction to fix the distortion of a photo, mostly gets used editing Real Estate photos which shows the professionalism of a Retoucher, as it needs much practicing and a professional human eye which knows what can be a better view of a photo.
There is no magic rule to be done when using lens correction in Photoshop to give out the best results however, much practicing can enhance your skills as a retoucher and give you a unique advantage.
, I do believe Lens correction and the liquify tool both are the tools that can really tell the experience of a retoucher. While most of the other/common tools are already known and used by everyone.
The keyboard shortcut for lens correction : ( Shift + Ctrl + R ) for windows ( Shift + Cmd + R ) for mac, you can also find it here from the filter menu as shown in the image below :
6. Selecting a layer from many layers
You are editing a photo which has many layers over each other, it's hard to scroll between all these layers to select the one you need, instead of trying each layer to check if it's the one you want to work on, you can use the Right-click selecting your layer with the move tool shortcut ( V ) then right-click on the image where it has the layer you need and select it.
Sometimes it may give you a contextual menu of 3: 5 layers as all of your layers exist in the same place on the image, then you can give a try to each of the 3: 5 instead of scrolling in the layer panel of Photoshop searching among hundreds or tens of other layers. Which will save you time during photo editing.
7. You can almost use any image as a texture
Far from using an image as a background for the photo being edited, any image exist can just be used as a texture as the flexibility Photoshop never ends for any usage, This works well especially when restoring Old Photos and replacing the texture of a picture. and here is an example :
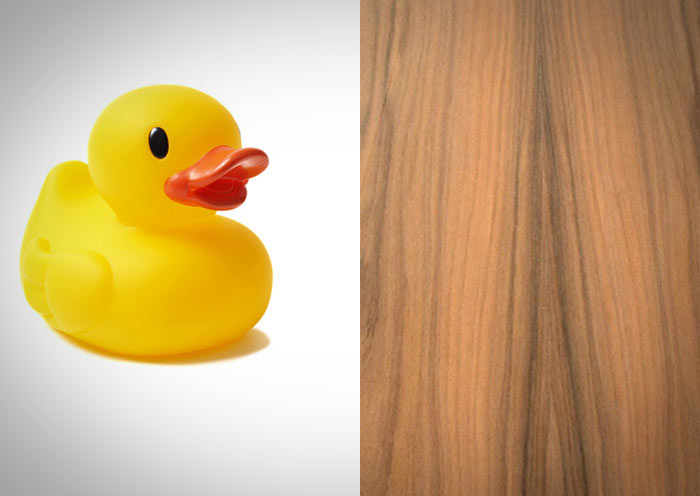
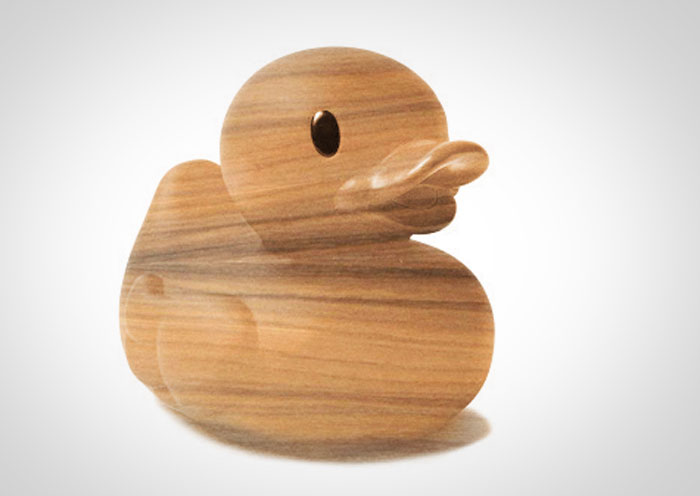
On the left side a picture of an object and on the right side the texture we need to use, this one here is a photo of wood, we will use it to turn the duck into a wooden textured.
From the Layer tab in Photoshop there are options you can set for layers, multiple options are available, in this case we have used the overlay option.
Putting the wood layer over the duck layer and setting it to overlay, the saturation has also been decreased for more natural results and this is what you will get after doing the steps mentioned.
A duck made of wood, no one actually can tell it was a plastic toy.
The overlay doesn't work in all the cases as it depends on the contrast and the colors, saturation of the photo, you will need to give a try to these options until you reach what you are looking for.
8. Increasing the History panel steps / states
If you are a professional retoucher you probably know that part, however one of the tricks using Photoshop everyone needs to be able to undo many steps in a photo by increasing the available steps in the History panel.
you can do this by opening preferences of Photoshop ( Ctrl + K ) for windows and (Cmd + K ) for mac will open the preferences panel, Head to performance, there you can find the History states the default is usually 20 steps/states you can increase it to hundreds or thousands my suggestion is to set it to 200: 300
Now you can undo your steps as many times as you want to a previous state.
9. Check the before and after constantly while editing
One of the most important tips and deep secrets that a professional retoucher does while working on Photoshop is to always keep track and check the before and after while the photo editing process.
To know where you have come to in a photo you have to have a look from time to time to the before version of the photo as you may smooth the skin too much or edit the photo too much that it would look fake.
using ( Ctrl + Space + Z ) for windows and (Cmd + Space + Z ) for mac will show you the original photo in the History panel and the last step of editing so that you can always compare between the before and after of your work, does it need more editing ! has it been smoothed so much ! colors have been adjusted correctly !?
Give it a try yourself and you will see the big difference in your work otherwise, you will not be able to know where you are now, has the edits been good or not that good !
10. Converting a photo to CMYK by accident !
Suddenly the colors of your photo changed color corrections is not fixing anything, it used to happen to me a lot of times until I got to know the solution you may have pressed ( Ctrl + Y ) that changed the colors which cause the Photo to be a CMYK instead of RGB.
CMYK is made for special types of printers that print a separate color on the photo each time ( the printing process happens through multiple times on a paper ) applying the Cyan-Magenta-Yellow-Black colors, mostly used in advertising while we use the Red-Green-Blue for RGB colors.
To fix the problem :
( Ctrl + Y ) for windows and (Cmd + Y ) for mac should fix the problem and convert the photo back to RGB.
The same goes for converting the photo into different Black & white versions of the photo by changing the channel accidentally, usually this happens when you hit ( Ctrl + 3,4,5 ) or (Cmd + 3,4,5 ) for mac.
( Ctrl + 2 ) for windows (Cmd + 2 ) for mac should show all the color channels back in the newer versions of Photoshop.
While the solution below works for old Photoshop versions :
By pressing ( Ctrl + ` ) for windows and (Cmd + ` ) for mac, the ( ` ) button is usually on the far left side of the keyboard right beside the Numbers keys this should convert the photo back to RGB.
In all the cases make sure to check the title on top of the image to see if the colors mode has changed, usually it will show either ( CMYK/8 – Red/8 – Green/8 – Blue/8 ) If it is showing ( RGB/8 ) you are safe.
11. Photoshop actions can save you a lot of time
Which is a series of commands you set and let Photoshop apply these same commands on more than an image applying the same filters or color adjustments or anything you need to apply.
Actions are time-saving when you have a lot of pictures and you don't want to repeat the same steps over and over again on each photo separately.
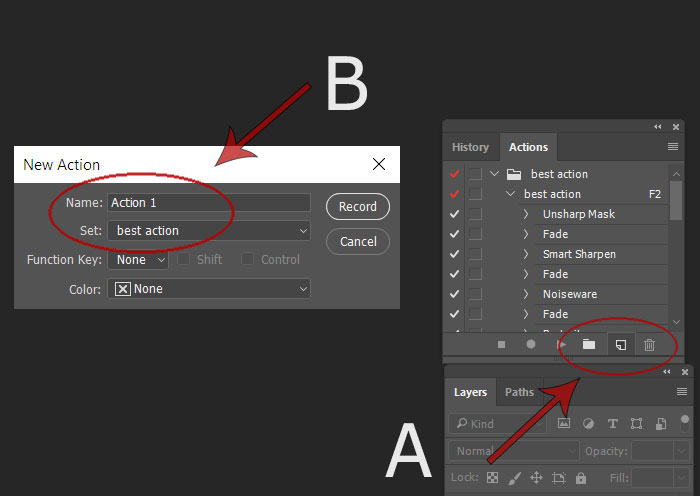
You can open the actions window from the ( window ) tab on top of Photoshop, all you need to do is to make a new action and start recording the commands that need to be applied :
- Click on the " New action " button as shown ( A ).
- Set the name of your action, Choose a function key "a shortcut to execute the action" ( B ).
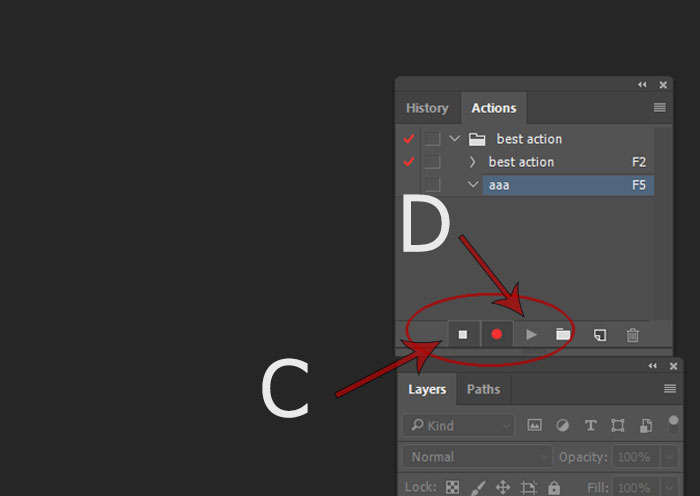
- Start recording the commands you need to apply on photos later.
- Click on stop button to stop recording ( C ).
- Click the play button or the function key you have set to execute the action F2, F3 .. etc. ( D ).
Things you can record using actions :
- Filters
- Color adjustments using ( Levels, curves, hue, brightness .. etc )
- Changing image size
- Copy and paste a text or an object on each photo
- Save and close each photo ( make sure to test it well )
These things can be recorded and applied to images accurately, while the main tools of Photoshop such as cloning stamp, smudge, burn tool .. etc. won't give accurate results when applying on multiple photos.
This method works on pictures that are opened already on Photoshop, but you can go further Automating the process by letting Photoshop open a Photo after another from a specific folder to apply the action on all the images in that folder, saving and closing each one.
This method is better than opening all the pictures at once and applying the action, as it decreases much of the used resources and makes the process goes faster and smoother
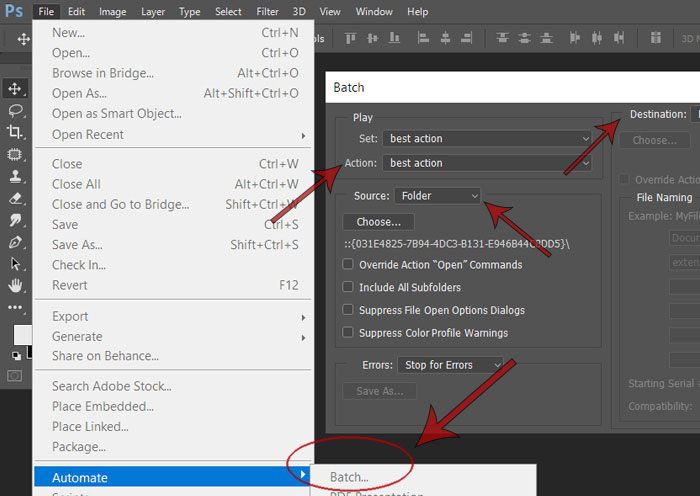
From : File >> Automate >> Batch..
- Choose the action you want to run
- From Source select the folder that contains that images
- Set the Destination to Save and close
- Click Ok to proceed the action
You can also choose ( opened files ) from Source instead of a folder to let the action run on the images already opened on Photoshop.
Make sure to test your Action more than a time on a copied version of your photo, as accidents happen sometimes and you may work on the original photo without noticing.
As someone I know applied the black & white colors on all the photos by accident after they all have been retouched, which took long hours to be retouched again.
12. Basic shortcuts you need to use
Things you need to know and use while working for ease of use and concentration on your images, simple shortcuts can help to make work easier on Photoshop and expand the space shown on screen without all the distractions around.
Hiding Tabs and panels :
You can hide the tabs and panels using the Tab button from your keyboard, hit the Tab button to hide the panels, hit back to show them again for better working experience.
Hide the Image bezels/borders :
By using the ( F ) button from the keyboard you will maximize the image hiding the borders, the title of your photo to concentrate more on the photo itself, on three stages the ( F ) button works.
- To hide the Photoshop panels and image borders
- To hide the image borders only
- To return back to the normal mode
The more you memorize Photoshop shortcuts the faster you become professional and skilled
Zoom in and out on Photoshop :
The normal way to do it is by choosing the ( zoom tool ) from the left-sided Photoshop panel or ( Z ) from the keyboard, however the fastest way is to just use.
Zoom in :
( Ctrl + Space + Mouse left click ) for windows
( Command + Space + Mouse left click ) for mac.
Zoom out :
( Ctrl + Alt + Space + Mouse left click ) for windows
( Command + Alt + Space + Mouse left click ) for mac.
There is still one more way if you prefer to give it a try, from the keyboard Num lock :
( Ctrl with Plus key ) To zoom in for windows
( Ctrl with Minus key ) To zoom out for windows
( Command with Plus key ) To zoom in for mac
( Command with Minus key ) To zoom out for mac
Conclusion:
The Photoshop tips mentioned here can help saving time and increase work efficiency though there are other things you still need to keep track on, while much practicing is the main key which will help you reach your goals in learning Photoshop for photo editing and graphic design in general.
You can check more photoshop tricks here that can help much in that regard.