Did you know that the vertical type tool in photoshop has been around since version 5.0, released back in 1998? for over two decades, this nifty tool has been helping designers and artists create stunning vertical text effects in their projects.
However, despite its long history, many users are still not fully aware of its potential. in the post, we'll dive deep into the world of the vertical type tool and reveal some tips and tricks you probably never heard of.
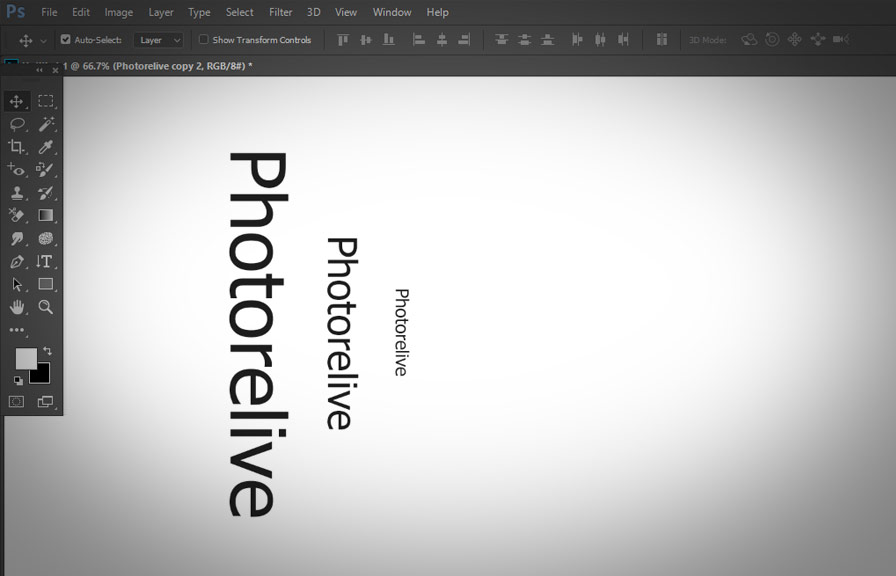
Find the vertical type tool in a jiffy
First, let's locate the vertical type tool in photoshop. to do this, click and hold the "type tool" icon in the toolbar (it looks like a "t"). a small menu should appear, and from there, you can select the "vertical type tool" (also represented by a "t", but rotated 90
Degrees).
Get the perfect font and size
Choosing the right font and size for your vertical text is crucial, as it can make or break your design. to make this process smoother, you can use the character panel, which offers various text customization options.
To access it, go to "window" > "character" in photoshop's top menu.
In the character panel, you can change the font, font style, size, and other properties. remember to experiment with different fonts to find the perfect fit for your project.
Master the art of vertical alignment
When working with vertical text, you might want to align it to the left, center, or right. to achieve this, you can use the paragraph panel. go to "window" > "paragraph" to open it.
In the paragraph panel, you'll find three alignment options for your vertical text: top, center, and bottom. select the one that best suits your design.
Create eye-catching, multi-layered effects
The vertical type tool can also be used to create multi-layered text effects. here's a simple technique to achieve this:
1. create a text layer with the vertical type tool.
2. duplicate the text layer (ctrl/cmd+j).
3. apply a different color or style to the duplicated layer.
4. move the new layer slightly off-center from the original (use the arrow keys for precision).
5. Adjust the opacity of the new layer to create a subtle, multi-layered effect.
Transform your vertical text with warp
Want to give your vertical text a unique shape or perspective? use the warp text feature. here's how:
1. select the text layer you want to warp.
2. click the "create warped text" button in the options bar (it looks like a "t" with a curved line below it).
3. in the warp text dialog box, choose a style from the "style" dropdown menu (e.g., arc, flag, or Fish).
4. adjust the bend, horizontal distortion, and vertical distortion sliders to fine-tune the effect.
5. click "ok" to apply the transformation.
Surprise fact: vertical type tool and 3d
Did you know that you can use the vertical type tool in combination with photoshop's 3d features? this little-known trick allows you to create stunning 3d text effects with ease. to get started, simply create a 3d layer from your vertical text by going to "3d" > "new 3d extrusion
From selected layer" in the top menu. from there, you can customize the 3d settings and even add materials and lighting effects to your vertical text.
Conclusion
Unlock the full potential of the vertical type tool in photoshop with these tips and tricks. from choosing the perfect font to creating multi-layered effects and even 3d text, this versatile tool offers endless possibilities for designers and artists.
Now that you're equipped with these techniques, it's time to make your next project stand out with stunning vertical text effects. happy designing!