Did you know that the horizontal type mask tool in adobe photoshop is a hidden gem that can transform your text-based designs in a matter of seconds? this powerful yet underrated tool allows you to create text-shaped selections that can be filled or manipulated to create eye-catching graphics.
In this post, we will explore some lesser-known tips on how to use the horizontal type mask tool effectively, helping you take your designs to the next level.
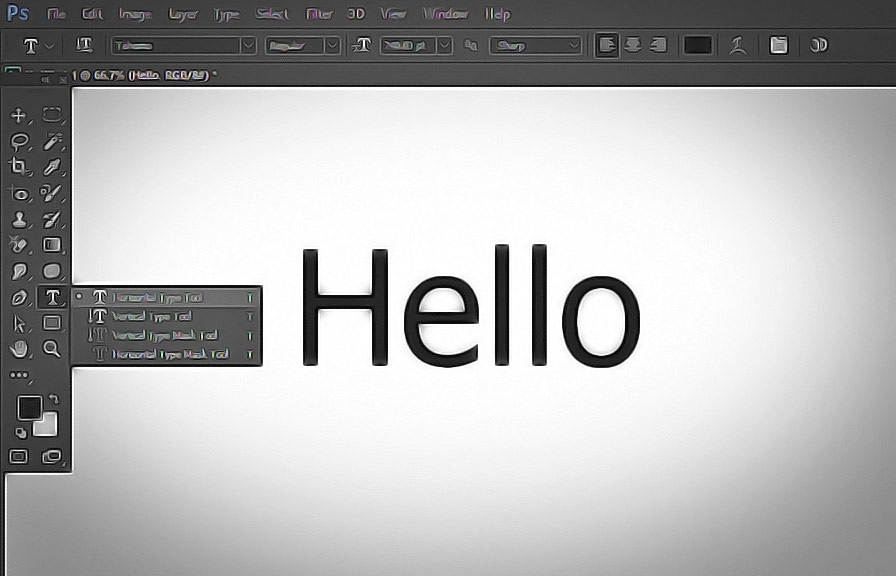
The basics: accessing the horizontal type mask tool
Before diving into the tips, let's go over how to access the horizontal type mask tool. it's not immediately visible in the default toolbar, but you can find it by clicking and holding on the type tool (the icon with a capital "t").
A fly-out menu will appear, and you'll see the horizontal type mask tool as the third option. select it, and you're ready to go!
Tip 1: combine text with images seamlessly
One of the most common uses for the horizontal type mask tool is to create a text-shaped selection that can be filled with an image. to do this, follow these simple steps:
1. create a new layer above the image you want to use.
2. select the horizontal type mask tool and type your desired text.
3. position the text where you'd like it to appear on your image.
4. With the selection still active, click on the eye icon next to your image layer to make it visible.
5. press `ctrl+j` (`cmd+j` on mac) to create a new layer using the selection.
6. you can now deselect (`ctrl+d` or `cmd+d`) and admire your text filled with the image.
Tip 2: experiment with blending modes
One way to bring a sense of depth and dynamism to your text-mask designs is by playing around with blending modes. photoshop offers a variety of blending modes that can drastically change the appearance of your text and the underlying image.
To experiment with blending modes:
1. select the layer containing your text-shaped image.
2. in the layers panel, click on the dropdown menu where it says "normal."
3. try out different blending modes, such as multiply, screen, or overlay, to see how they interact with your image.
Remember, there's no one-size-fits-all solution, so feel free to experiment and find the perfect blending mode for your design.
Tip 3: add gradients for extra flair
Adding a gradient to your text-shaped selection can give it a more polished and professional look. here's how to add a gradient to your text mask:
1. create a new layer above your text-shaped image.
2. with the horizontal type mask tool selected, type your text again and position it in the same place as before.
3. select the gradient tool (g) and choose a gradient from the options panel.
4. Click and drag on your canvas to apply the gradient to your text selection.
5. change the blending mode of your gradient layer to overlay or another mode that complements your design.
Tip 4: create knockout text for a bold effect
Knockout text is a technique that "punches out" your text from the background, creating a see-through effect. here's how to create knockout text using the horizontal type mask tool:
1. add a solid color or gradient layer above your background image.
2. select the horizontal type mask tool and type your text.
3. position the text where you want it on your design.
4. right-click the text selection and choose "select inverse" to invert the selection.
5. Select the solid color or gradient layer and press `delete` (`backspace` on windows) to remove the selected area.
6. deselect (`ctrl+d` or `cmd+d`) to see your knockout text effect.
Tip 5: add a stroke for better readability
If your text is getting lost in the background, adding a stroke can help increase its visibility. to add a stroke to your text mask:
1. create a new layer above your text-shaped image.
2. with the horizontal type mask tool selected, type your text again and position it in the same place as before.
3. right-click the text selection and choose "stroke."
4. In the stroke dialog box, adjust the width, color, and blending mode of the stroke to suit your design.
5. click "ok" to apply the stroke.
Conclusion
The horizontal type mask tool in photoshop offers you endless creative possibilities. by following these tips and experimenting with different techniques, you can create stunning text-based graphics that are sure to impress. so, go ahead and unlock the full potential of the horizontal type mask tool in your next design
Project!