Did you know that the lasso tool in photoshop has been around since the very first version of the software? that's right! this versatile selection tool has been helping artists and designers make precise selections and create stunning visuals for over three decades.
In this post, we'll explore some lesser-known tips and tricks to help you get the most out of the lasso tool and unleash your creative potential.
A brief overview: lasso tool variations
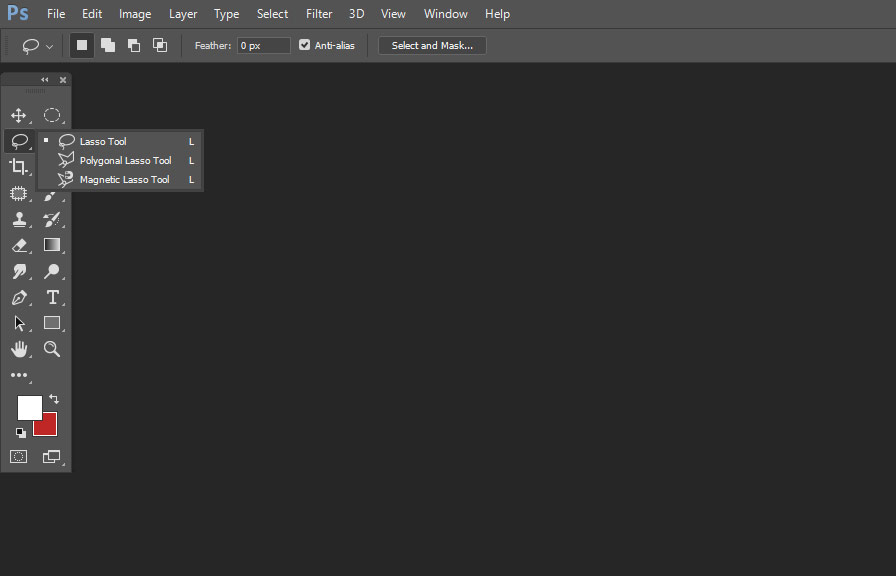
There are three types of lasso tools in photoshop:
1. Lasso tool: this is the most basic version, which allows freehand drawing of selections.
2. Polygonal lasso tool: designed for straight-edged selections, this tool lets you create polygonal shapes by clicking points on the canvas
3. Magnetic lasso tool: this smart tool automatically detects and snaps to the edges of objects, making it ideal for selecting objects with complex edges.
Now that we know the different lasso tools available, let's dive into some tips and tricks to make the most of them.
Tip #1: shortcut keys for faster workflow
You can quickly switch between the three lasso tools by pressing the L key on your keyboard. to cycle through them, hold down the Shift key while pressing L. this will save you valuable time when working on complex projects.
Tip #2: modify your selections with feathering
Feathering is a technique that softens the edges of a selection, creating a smoother transition between the selected and non-selected areas. to apply feathering to your lasso tool selections, go to the options bar at the top of the screen and enter a value in the feather field.
Higher values will result in a softer, more diffused edge.
Tip #3: master the art of adding and subtracting
It's common to accidentally over-select or under-select an area while using the lasso tool. fortunately, photoshop allows you to add or subtract from an existing selection. to add to a selection, hold the Shift key while drawing a new area.
To subtract from a selection, hold the Alt (windows) or Option (mac) key while drawing.
Tip #4: utilize the magnetic lasso tool's settings
The magnetic lasso tool has several settings that you can adjust to better detect the edges of your subject. in the options bar, you can change the following:
- width: determines the distance from the pointer within which the tool detects edges.
- contrast: adjusts the tool's sensitivity to edge contrasts.
- frequency: controls the rate at which the tool sets anchor points automatically.
Experiment with these settings to achieve the best results for your specific image.
Tip #5: combine lasso tools for maximum flexibility
Sometimes, a single lasso tool may not be enough to make the perfect selection. don't be afraid to mix and match the different lasso tools to create complex selections. for example, you might use the polygonal lasso tool to select straight edges and then switch to the magnetic lasso tool
For curvy parts.
Tip #6: refine your selections with quick mask mode
Quick mask mode is a powerful feature that allows you to fine-tune your selections using brushes. press Q to enter quick mask mode, and your selection will be displayed as a red overlay. you can then use the brush tool to paint over areas you want to add or
Remove from your selection. press Q again to exit quick mask mode and see the updated selection.
Tip #7: save and load selections for future use
If you've spent a significant amount of time perfecting a selection, it's a good idea to save it for future use. go to Select > save selection and give your selection a name. to load a saved selection, go to Select > load selection and choose the desired
Selection from the dropdown menu.
Tip #8: transform your selections
After creating a selection with the lasso tool, you may need to resize, rotate, or otherwise transform it. press Ctrl + t (windows) or Cmd + t (mac) to activate the free transform tool, and use the handles to adjust your selection as needed.
Press Enter to confirm the transformation.
Tip #9: create selections from paths
You can convert a path into a selection using the lasso tool. first, create a path using the pen tool. then, go to the paths panel, right-click on the path, and choose Make selection. you can also apply feathering and other modifications to the selection at this stage.
Tip #10: apply layer masks for non-destructive edits
Finally, one of the best practices when using the lasso tool is to apply your selections as layer masks. this allows you to make non-destructive edits, meaningyou can easily revert or modify your changes later. to add a layer mask based on your selection, click the Add layer mask
Button at the bottom of the layers panel.
With these tips and tricks in hand, you're well-equipped to make the most of the lasso tool in photoshop. practice and experiment with different techniques to create stunning visuals and unlock your full creative potential. remember, the key to mastering any tool in photoshop is patience and persistence, so don't
Be afraid to try new things and learn from your mistakes. happy editing!