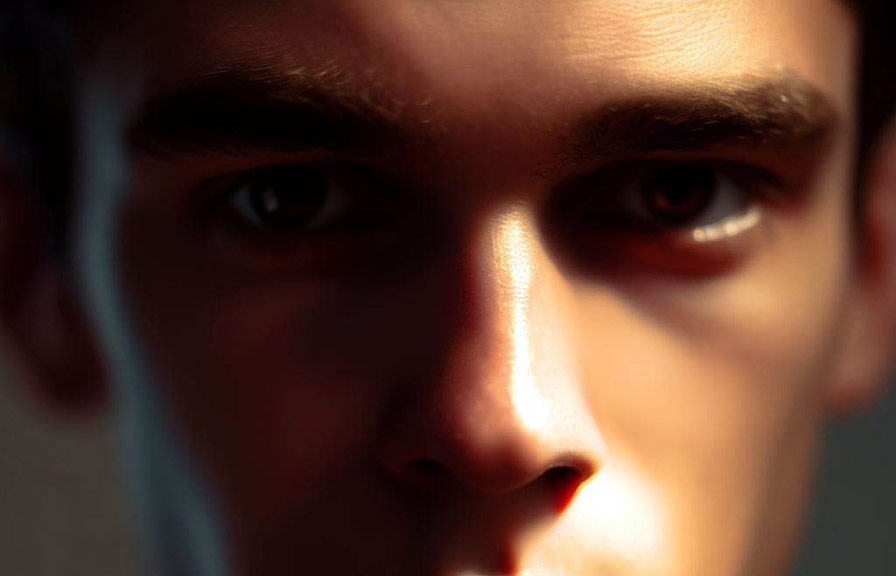
Did you know that the ancient greeks and romans were among the first to use mirrors and other reflective surfaces to manipulate light in their artwork? this technique, known as "chiaroscuro," was later popularized by famous painters, such as caravaggio and rembrandt, who mastered the art of creating dramatic contrasts between light
And shadow in their portraits. today, photographers can achieve similar effects using modern tools, such as reflectors and filters.
Reflectors: bouncing light for a perfect portrait
A reflector is an essential tool for portrait photographers who want to create a well-lit subject without resorting to artificial light sources. these handy accessoriesare designed to bounce natural or artificial light back onto the subject, filling in shadows and adding a touch of sparkle to the eyes.
The different types of reflectors
Reflectors come in various shapes, sizes, and colors, each with its own unique impact on the quality of light in a portrait. here are four popular types of reflectors and how they affect your photos:
1. Silver reflectors - these provide the most significant light output and create a cooler, more specular light. they're ideal for adding a dramatic edge to your portraits or when you need to fill in deep shadows.
2. Gold reflectors - these produce a warm, glowing light that can enhance skin tones and add a subtle, sun-kissed look to your portraits. they're ideal for outdoor shoots on cloudy days or during the golden hour.
3. White reflectors - these generate a soft, diffused light that mimics natural sunlight. they're perfect for filling in shadows without adding too much contrast, making them suitable for close-up portraits and beauty shots.
4. Black reflectors - also known as "flags," these absorb light rather than reflecting it.
They're used to create deeper shadows and add dimension to your portraits.
How to use reflectors in portrait photography
Here are a few tips to help you make the most of your reflector:
- Experiment with different angles and distances to find the best position to bounce light back onto your subject.
- Use a stand or an assistant to hold the reflector steady, or even consider using a clamp to attach it to a tripod.
- Be mindful of the direction of the light source. for example, if you're using the sun as your primary light source, make sure it's not directly behind your subject, as this can create harsh shadows and lens flare.
Filters: shaping light for creative effects
Filters are another powerful tool that can help you add a glimpse of light and shadow to your portrait photos. these glass or plastic accessories are mounted on the front of your camera lens and can affect the color, contrast, and overall mood of your images.
Types of filters for portrait photography
There are many filters available, but for portrait photography, these three are the most commonly used:
1. Polarizing filters - these filters reduce glare and reflections, enhancing the colors and contrast in your images. they're especially useful for outdoor portraits, where they can darken blue skies and make white clouds pop.
2. Neutral density (nd) filters - these filters reduce the amount of light entering the camera without affecting color balance. nd filters are perfect for shooting portraits in bright sunlight while maintaining a shallow depth of field, or for creating long-exposure effects like motion blur.
3. Graduated neutral density (gnd) filters - these filters feature a gradual transition from dark to clear, allowing you to balance the exposure between the sky and the foreground in your images. they're useful for outdoor portraits with a bright background, such as sunsets or sunrises.
How to use filters in portrait photography
To get the most out of your filters, follow these tips:
- Choose the right filter for the lighting conditions and desired effect. for example, use a polarizing filter to enhance colors on a sunny day, or an nd filter to shoot wide-open in bright sunlight.
- Stack multiple filters for even more creative control. for instance, you can combine a polarizing filter with annd filter to darken the sky while maintaining a shallow depth of field.
- Clean your filters regularly to avoid dust and smudges that can degrade image quality.
Wrapping up
By mastering the art of using reflectors and filters, you can add a touch of light and shadow to your portrait photos, creating images with depth, dimension, and drama. so, next time you plan a portrait session, remember to pack your reflectors and filters along with your camera gear and
Unleash your creativity!