Did you know that the term macro comes from the greek word *makros*, meaning large? it's an ironic twist for a photography technique that's all about capturing the tiniest details of our world. in the fascinating realm of macro photography, focus stacking is a game-changer that can take your images from
Good to exceptional. in the post, we'll dive deep into this powerful technique, explore how it can improve your macro photos, and discuss some of the best focus stacking software available.

A world of detail: what is focus stacking?
Focus stacking is a digital image processing technique that combines multiple photographs taken at different focus distances to create a single image with a greater depth of field (dof). this means that more elements within the photo will appear sharp and in focus.
This is particularly useful in macro photography, where the shallow depth of field often means that only a small portion of the subject is in focus, leaving the rest of the image blurred.
By using focus stacking, you can create images that retain the stunning level of detail that macro photography is known for while also ensuring that your entire subject is in sharp focus. the end result is a professional-looking, high-quality image that will leave viewers in awe.
Step by step: how to use focus stacking to improve macro photos
To achieve professional results with focus stacking, follow these simple steps:
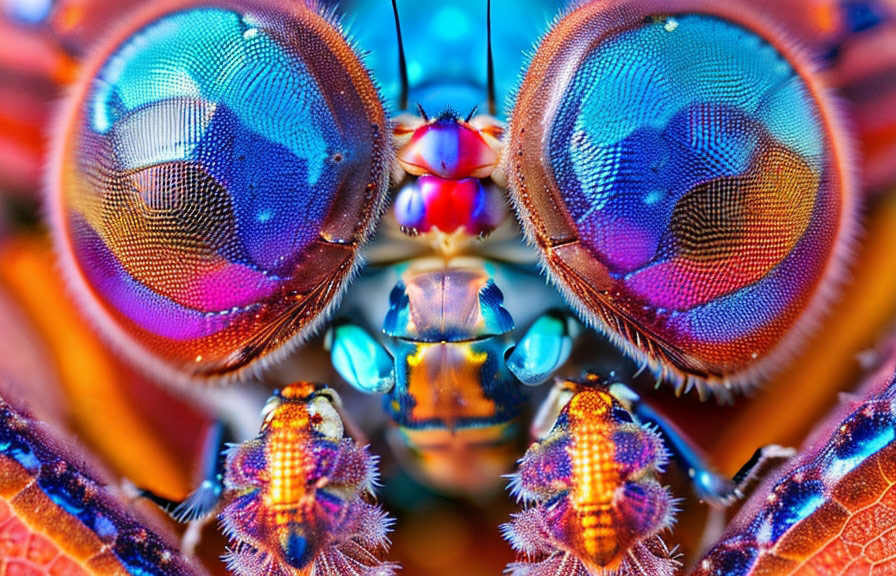
1. Choose a suitable subject: focus stacking works best with subjects that have intricate details and textures. good examples include insects, flowers, or small objects with interesting surfaces.
2. Set up your camera and subject: mount your camera on a sturdy tripod, and use a macro lens or extension tubes to get as close to your subject as possible. make sure your subject is well-lit, either with natural light or a dedicated macro flash.
3. Take multiple photos at different focus distances: manually adjust the focus of your lens, starting from the closest point of your subject and gradually moving towards the furthest point. take a photo at each focus distance, ensuring that the entire subject is covered.
It's a good idea to use a remote shutter release or your camera's self-timer to avoid any camera shake.
4. Combine the images using focus stacking software: import the images into focus stacking software, which will automatically detect and merge the sharpest parts of each photo to create a single image with an extended depth of field.
5. Post-process the final image: after the software has combined your photos, you may need to make some final adjustments in your favorite photo editing software. this can include tweaking the exposure, contrast, and sharpening to achieve the desired look.
Top picks: the best focus stacking software
There are several focus stacking software options on the market, each with its unique features and capabilities. here are three of the best options for photographers of all skill levels:
1. Helicon focus: helicon focus is one of the most popular focus stacking software options available. it offers an intuitive interface, batch processing capabilities, and advanced retouching tools that allow you to fine-tune your images with ease.
Thesoftware also provides a 3d visualization feature, which can help you better understand the focus points in your stacked image. helicon focus is available for both windows and macos, with a free trial and a variety of pricing options.
2. Zerene stacker: zerene stacker is another top choice for focus stacking, known for its speed, quality, and flexibility. the software offers two stacking methods, pmax, and dmap, which can be used separately or combined for optimal results.
Zerene stacker also provides retouching tools and supports batch processing. it is available for windows, macos, and linux, with a free trial and multiple pricing tiers.
3. Adobe photoshop: as a versatile and widely-used image editing software, adobe photoshop also offers focus stacking capabilities through its "auto-blend layers" feature. while it may not have the dedicated focus stacking tools that helicon focus and zerene stacker provide, it's a great option for photographers already familiar with
Photoshop's workflow. the focus stacking feature can be found under the "edit" menu, and although it may not be as advanced as other options, it can still produce impressive results.
The hidden depths of macro photography
Now that you've learned about focus stacking, it's time to let you in on a little-known fact about macro photography: it's not just for nature and small objects! with the right creative approach and the power of focus stacking, you can capture stunning macro shots of everyday items, revealing hidden
Textures and details that are normally invisible to the naked eye.
For example, have you ever looked closely at the grooves of a vinyl record, the fibers in a banknote, or the crystalline structure of a sugar cube? these common objects can transform into captivating macro subjects when viewed up close and photographed with focus stacking.
So, the next time you're searching for inspiration, remember that the world of macro photography is much larger than it initially appears.
Conclusion
In the world of macro photography, focus stacking is a game-changing technique that can elevate your images to a professional level. by combining multiple photos taken at different focus distances, you can create images with an extended depth of field that showcase the intricate details of your subjects.
With a little practice and the right focus stacking software, you'll be well on your way to capturing breathtaking macro images that will leave your viewers in awe.
So, why not grab your camera, dive into the tiny world of macro photography, and start experimenting with focus stacking? you might just be surprised by the incredible results you can achieve.